The Best Places to Travel and Photograph in July
Some months, you can go almost anywhere, and it works out fine. July is not one of those months.
This is the month lavender fields across Provence hit their brief, glorious peak, before farmers cut them down for oil. It's the month when wildebeest start crashing into rivers thick with crocodiles across the Serengeti and the Maasai Mara. It's the month the sun over Norway simply refuses to set, handing you hours of golden light instead of twenty rushed minutes at dusk.
Miss the window, and you wait a full year to try again. Catch it, and you walk away with photographs you could not have taken any other month.
So don't wander this July. Go on purpose. Every destination on this list earned its spot for one reason: this is genuinely one of the best months on earth to point a camera at it.
How These Destinations Were Chosen
These five destinations were selected based on peak seasonal photography conditions in July: wildlife activity, natural phenomena, landscape cycles, quality of light, and accessibility for photographers. Popularity was not a factor. Each destination had to offer something in July that it simply cannot offer at any other time of year. Each one also has a full Travel and Photography Guide on Chasing Hippoz so you can plan every detail of your trip before you go.
1. Kenya (The Masai Mara)
Why July Specifically
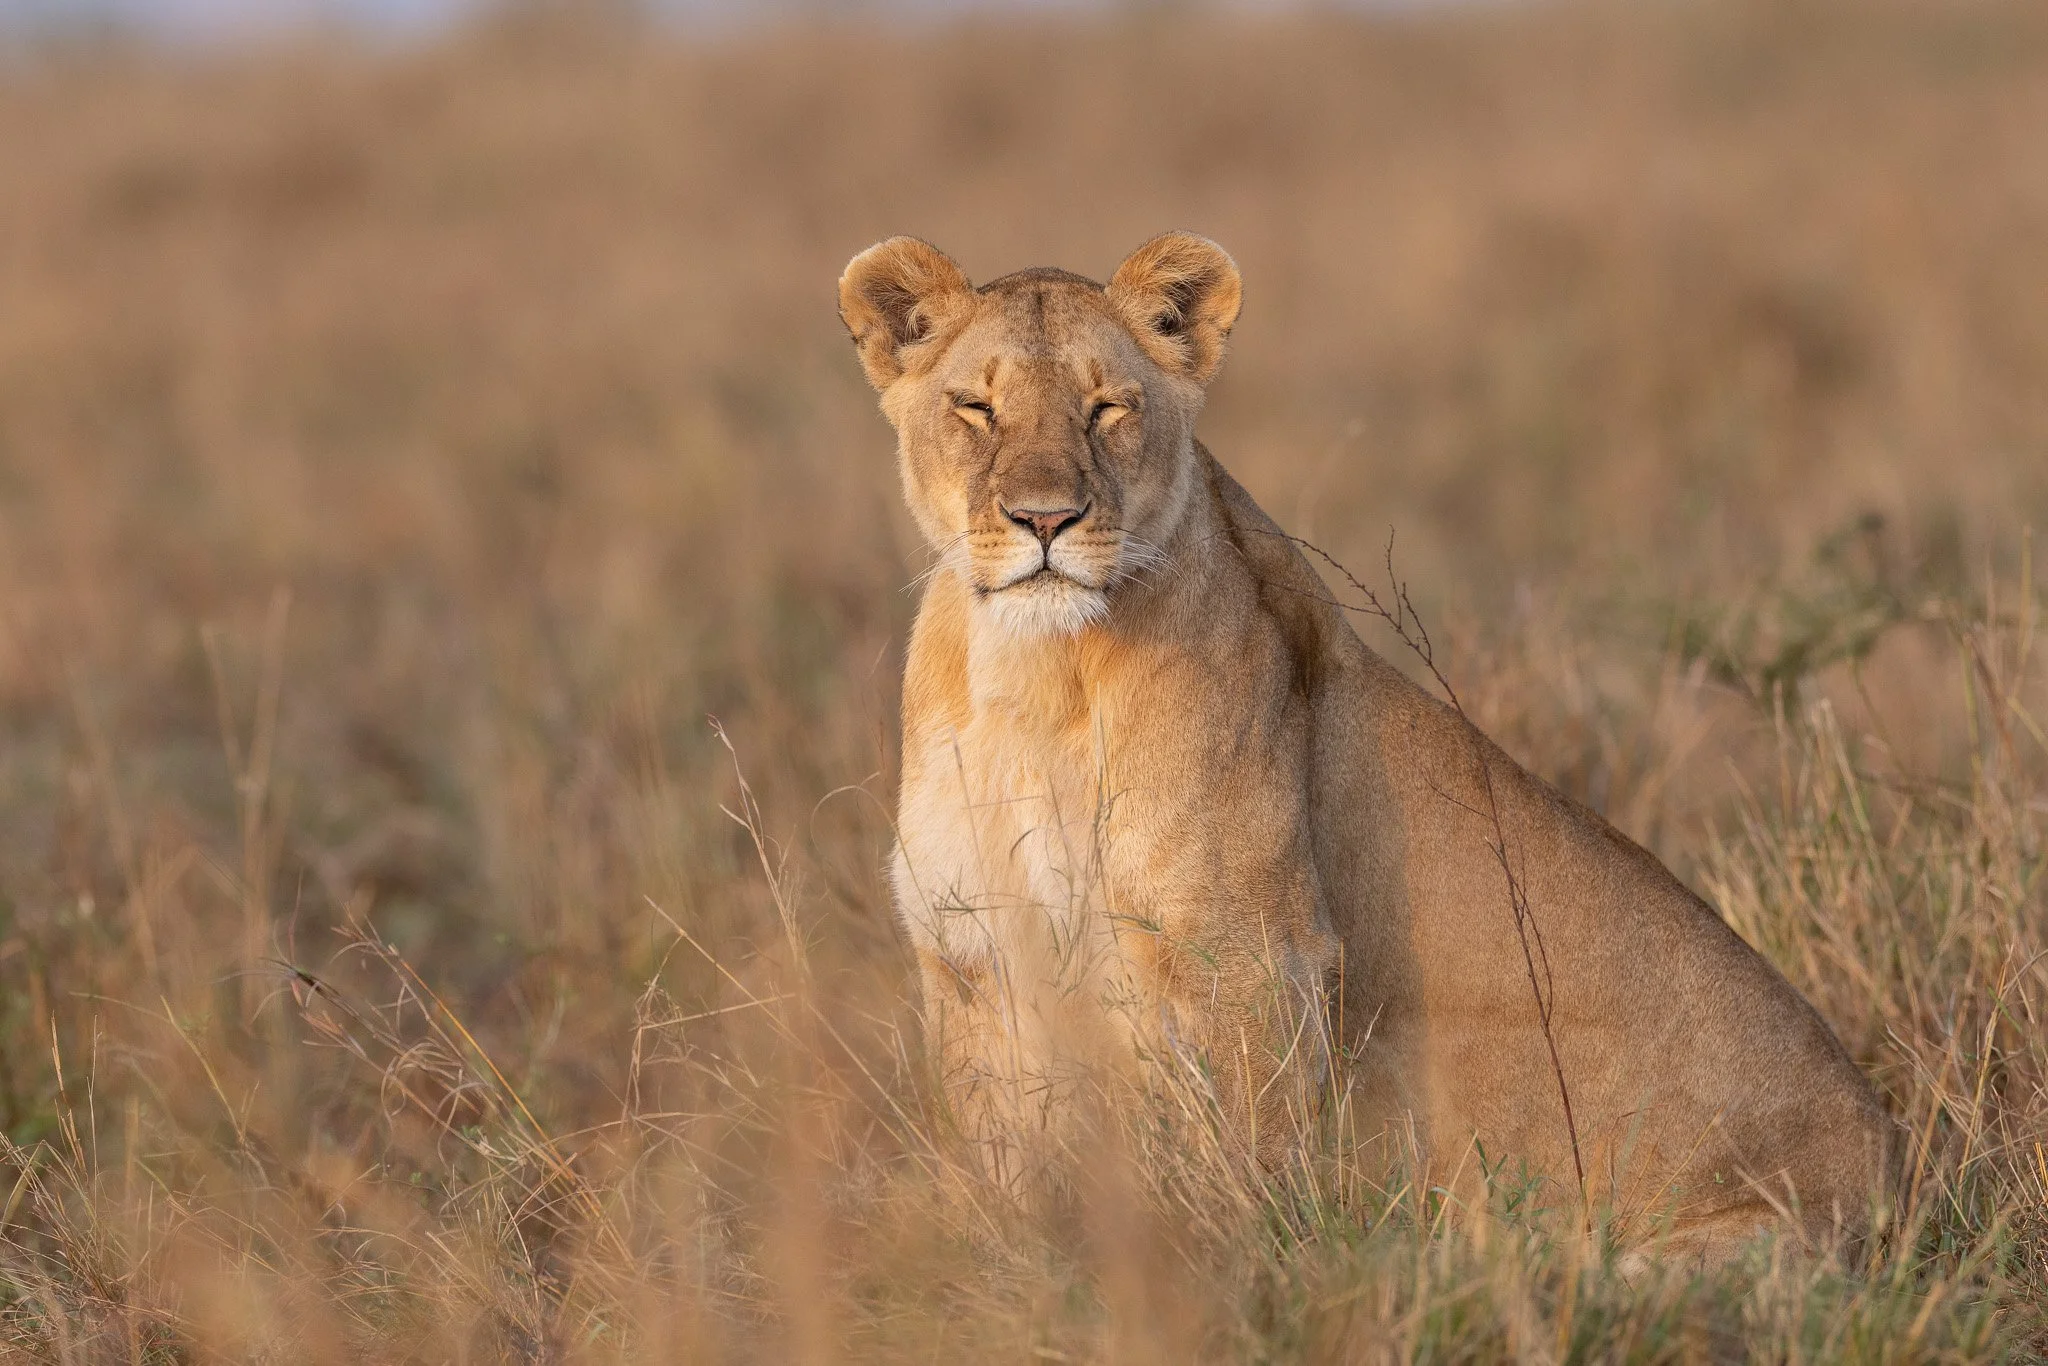
July marks the beginning of one of the greatest wildlife events on earth. The Great Migration, where over two million wildebeest, zebra, and gazelle move north from Tanzania's Serengeti into Kenya's Masai Mara, reaches its most dramatic chapter this month. The Mara River crossings begin in July. Thousands of animals plunge into crocodile-filled water in a chaos of dust, hooves, and raw survival instinct. You cannot predict exactly when a crossing will happen. That unpredictability is part of what makes it extraordinary.
Beyond the Migration, July is dry season in Kenya. Vegetation thins, animals concentrate around water sources, and the open savanna makes sightings easier and more photogenic. The light is warm and directional in the early morning and late afternoon, the kind of light that makes images look like they came out of a National Geographic spread.
What to Photograph
There is nothing like waking up before sunrise in the Masai Mara and climbing into the safari vehicle as the sun comes up. That first hour of light is pure magic. Elephants moving through golden grass. Lions stretched out on rocky outcrops. Cheetahs scan the plains from termite mounds. Then, if you are lucky, a river crossing: the chaos of it, the noise, the dust, the tension between predator and prey. These are the images that stay with you long after you come home.
Outside the Migration drama, keep your lens ready for intimate wildlife moments: a mother elephant with her calf, a leopard draped over an acacia branch, flamingos reflected in a distant lake. Kenya delivers constantly if you stay patient and stay out.
Best Time to Shoot
Get out at first light and stay until 10 am. Go back out at 4 pm and stay until the sun drops. Those four hours bookend your day and give you the warmest, most directional light on the savanna. Midday is harsh and flat; use it to rest and review your images. River crossings can happen at any time, so position yourself near the Mara River during the morning hours when activity tends to peak.
Photography Tips
Mirrorless and DSLR: A telephoto lens is essential. Bring a 100-400mm or 200-600mm equivalent as your primary lens. A 70-200mm lens works well for larger animals at close range and for environmental compositions. A wide or standard zoom covers camp atmosphere, sunrise skies, and vehicle moments. A bean bag for the vehicle window edge is far more practical than a tripod on safari. Bring extra batteries; cold mornings and continuous shooting drain them fast.
iPhone: Set burst mode before any wildlife movement begins. Use the 3x telephoto lens for individual animal portraits at close range. Shoot in ProRAW during golden hour for maximum editing latitude. For river crossings from a distance, focus on wide environmental shots that capture the scale of the event rather than trying to isolate animals you cannot reach with your focal length.
What to Watch Out For
Peak migration season means high demand for the best camps and the best guides. Book your safari operator at least six months out, ideally longer for July. The most iconic crossing points attract multiple vehicles; the photographers who get the cleanest shots are those positioned first, with guides who read animal behavior well. Your guide matters as much as your gear.
Planning Notes
July is dry and warm, with daytime temperatures around 25 to 30°C. Nights and early mornings are cool; bring a light fleece for pre-dawn game drives. Fly into Nairobi and connect to one of the airstrips near the Mara. Book a camp that offers full-day game drives, not just morning and evening excursions, so you can stay near the river when crossings feel imminent.
Luxury: Angama Mara, Mara Plains Camp Mid-range: Sentinel Mara Camp, Olakira Migration Camp
📷 Pro Photographer Tip
Ask your guide to position the vehicle with the sun behind you during the golden hour. It sounds obvious, but most vehicles follow the animal and end up shooting into the light. The difference between a backlit silhouette and a fully lit lion at dawn comes down to where your vehicle is pointing. Talk to your guide the night before about your priorities as a photographer. A great guide adjusts everything for you. A mediocre one will not unless you ask directly.
Planning a Kenya trip? My complete Kenya Travel and Photography Guide covers the best parks, Migration timing, camp recommendations, and exactly what gear works in the field.
2. The Dolomites, Italy
Why July Specifically
The Dolomites in July offer something winter and spring cannot: full access combined with extraordinary light. The alpine meadows are in bloom, wildflowers covering the valleys in yellow, purple, and white. The famous enrosadira phenomenon, where the white limestone peaks blush pink and orange at sunrise and sunset, is most dramatic when the sky is clear and the air is clean. July delivers both reliably. Golden hour stretches well past 9 pm. You have more shooting time here than almost anywhere else in the world this month.
What to Photograph
The Dolomites are bigger than most people expect, and this is one of the most important things to understand before you go. I recommend staying in at least two different areas so you can cover the range of compositions available and catch sunrise in different valleys without spending half your morning driving.
Each area has its own iconic moments. Tre Cime di Lavaredo at sunrise with the pink alpenglow on the three stone towers. The Alpe di Siusi plateau is covered in wildflowers with the Sassolungo massif behind it. The church at Ortisei has mountain walls rising behind the spire. Val Gardena villages at golden hour when the chalets glow amber and the meadow grass turns gold. Seeing the alpenglow on those mountains at sunrise is something that does not leave you. Set your alarm for 4:30 am. It is worth every minute of lost sleep.
Best Time to Shoot
Sunrise is the priority. The enrosadira lasts only minutes, and the light changes fast; be at your location before the sun hits the peaks, not after. Sunset is equally powerful, especially from higher elevations. Afternoon thunderstorms are common in July and often dramatic. Position yourself near a ridge with a clear view west, and you may get storm light that rivals anything else you shoot all year.
Photography Tips
Mirrorless and DSLR: A wide to standard zoom (16-35mm or 24-70mm) covers most landscape compositions. Bring a telephoto (70-200mm) for isolating individual peaks, compressing wildflower foregrounds against distant rock faces, and shooting villages from above. A sturdy tripod is essential for sunrise work. A circular polarizer reduces glare on alpine lakes and deepens the sky. Bring a rain cover; afternoon thunderstorms arrive fast and without much warning.
iPhone: The ultrawide lens handles broad alpine panoramas well. For sunrise alpenglow, use the standard lens rather than ultrawide; it gives you better color accuracy in low light. Use AE/AF Lock by pressing and holding on the mountain peaks to prevent the camera from exposing for the bright sky and leaving your foreground dark.
What to Watch Out For
The most accessible viewpoints, especially Tre Cime, attract large crowds by mid-morning. Arrive before 6 am or accept that you will be composing around other people. Parking fills at popular trailheads by 8 am in July; use the shuttle buses from Misurina or Cortina for the busiest areas. Afternoon thunderstorms can appear within 20 minutes on a clear day; carry a rain layer and watch the western sky after 2 pm.
Planning Notes
July is peak season in the Dolomites. Book accommodation at least three months out. Base yourself in two areas, Cortina d'Ampezzo for the eastern Dolomites, and Ortisei or Selva for the Alpe di Siusi and Val Gardena area. Most major viewpoints require a short hike of 30 to 90 minutes. Comfortable walking shoes are enough for the main routes; proper hiking boots for anything more ambitious.
Luxury: Rosa Alpina (San Cassiano), Cristallo Resort (Cortina) Mid-range: Hotel La Perla (Corvara), Garni Residence Cosser (Ortisei)
📷 Pro Photographer Tip
Shoot the enrosadira from the valley looking up, not from the summit looking out. Most photographers hike to the top and shoot the view. The most powerful alpenglow images come from a low position in a wildflower meadow with the peaks filling the upper two-thirds of the frame. The flowers give the image depth and scale that a summit shot rarely achieves.
Everything you need to plan your Dolomites shoot is in my Dolomites Travel and Photography Guide, including the best viewpoints by valley, sunrise timing, and where to stay.

3. Iceland
Why July Specifically
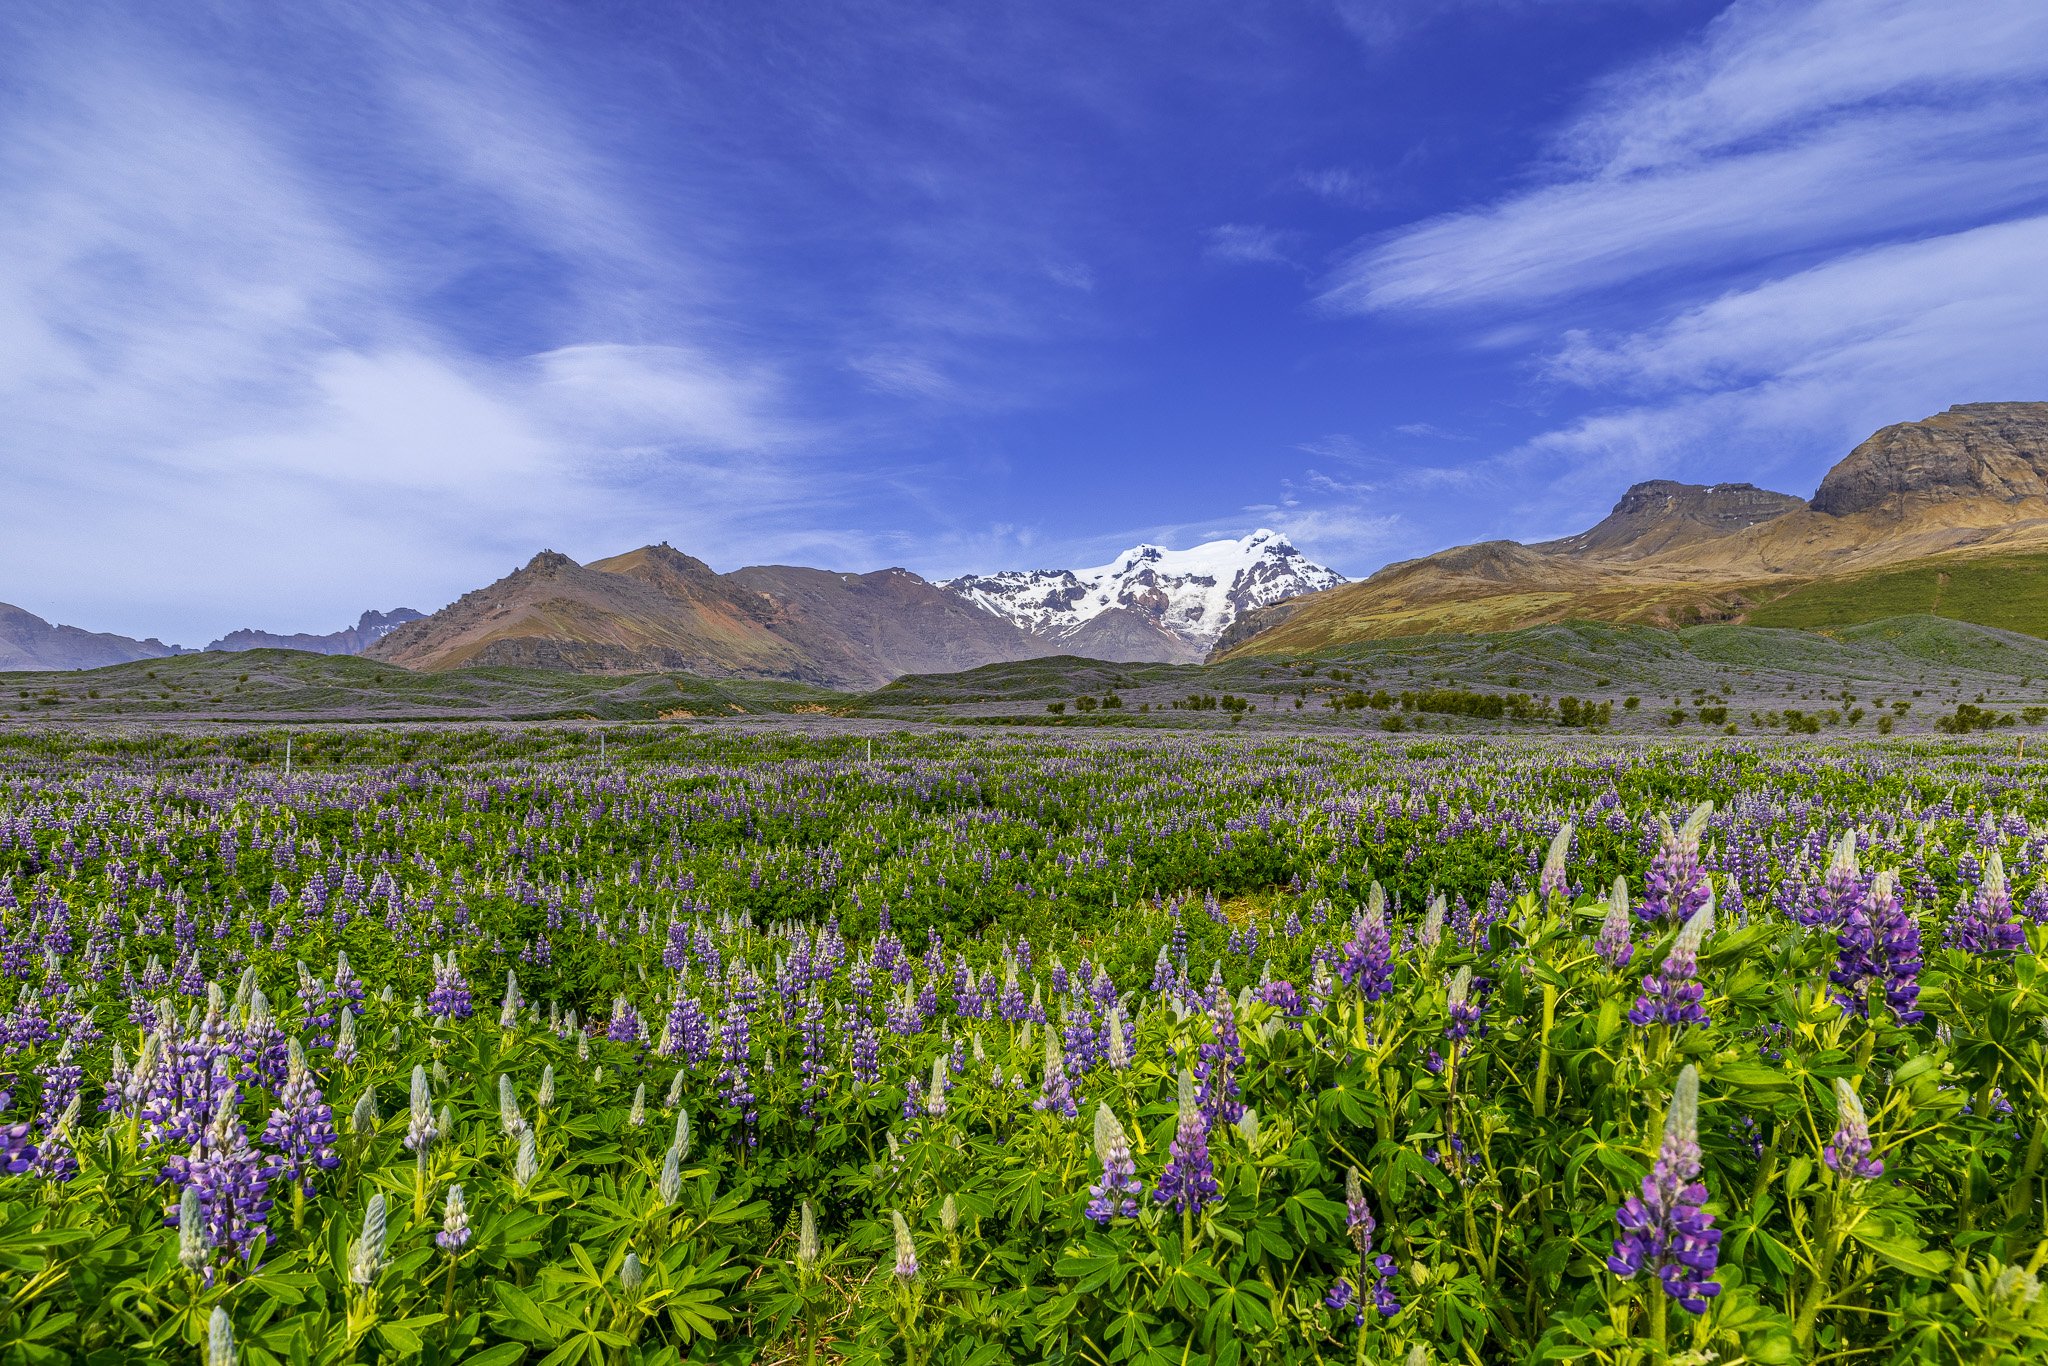
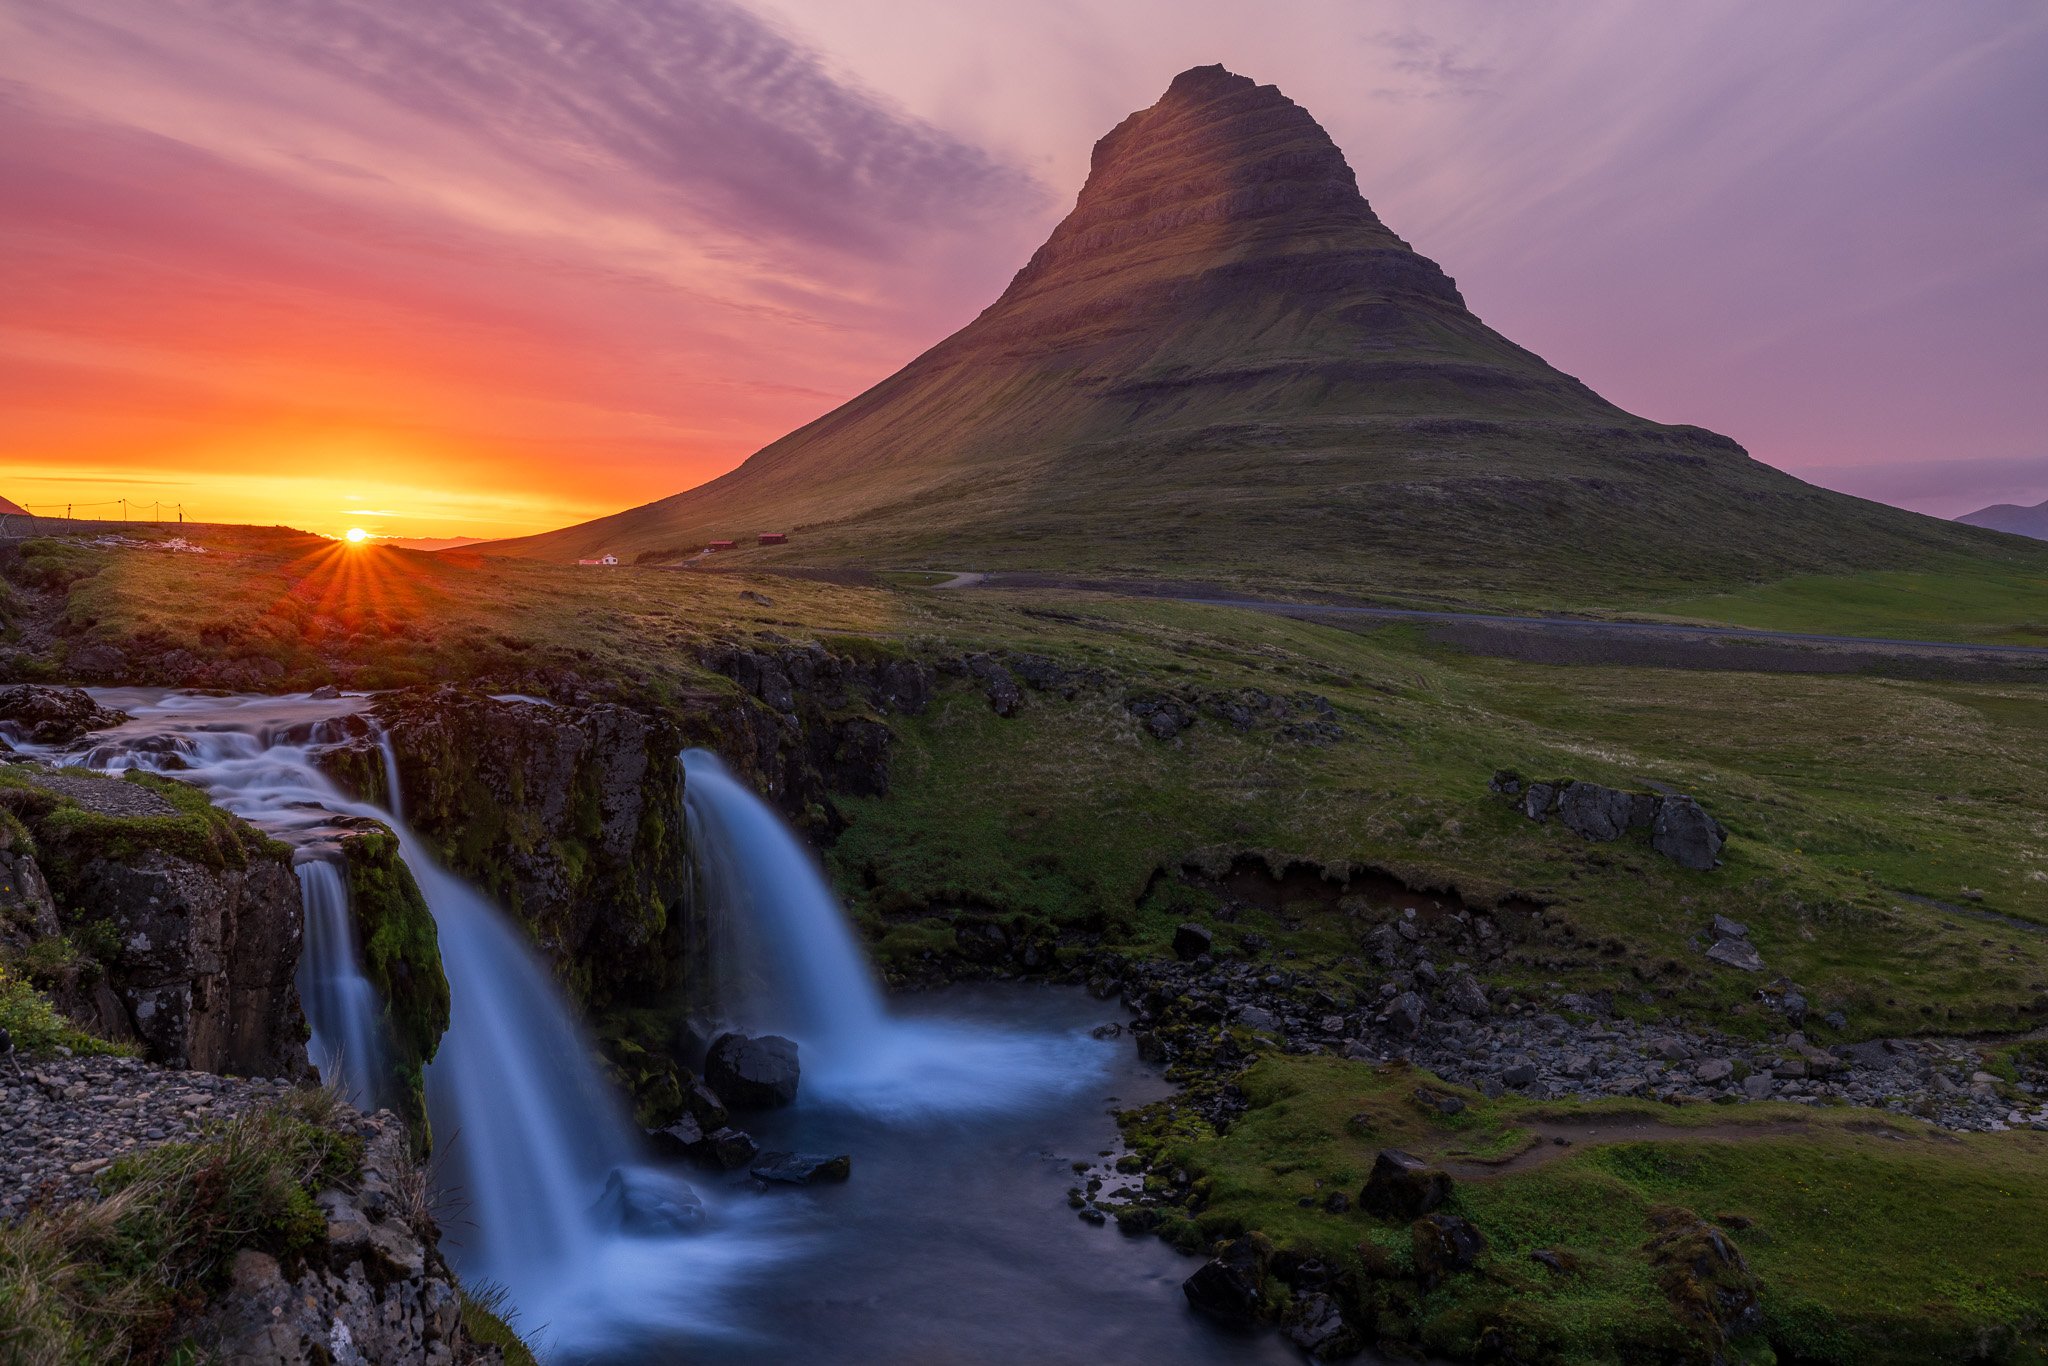
Iceland in July is a completely different country from the Iceland most people imagine. There is no darkness. The sun dips toward the horizon around midnight, turns the sky amber and pink, and then climbs again without ever fully setting. Golden hour lasts three to four hours. You can shoot at 3 am and again at midnight, and in between, lupine fields covering the south coast are in full purple bloom against black lava fields. Waterfalls run at their highest volume from snowmelt. The roads are fully open. This is Iceland at its most accessible and its most photographic.
What to Photograph
The single most important piece of advice I can give you about Iceland is this: get away from Reykjavik. The further you drive from the capital, the fewer people you encounter and the more powerful the landscapes become. The south coast is where Iceland earns its reputation.
Standing on the black sand beach at Vik at sunrise as the sky turns orange above the Reynisdrangar sea stacks is one of the great photographic experiences I have had anywhere in the world. Vestrahorn mountain rising over the black sand and mirror-still water at Stokksnes is the kind of composition that makes you understand why photographers keep coming back. Skógafoss, Seljalandsfoss, and the lesser-known waterfalls along the Ring Road run at full force in July. Lupine fields in bloom add color and foreground interest to landscapes that are already extraordinary.
Best Time to Shoot
With the Midnight Sun, your shooting window is unlike anywhere else. The warmest, most directional light falls between 10 pm and 2 am, when the sun is low on the horizon but still above it. Many photographers shoot through the night and sleep from 6 am to noon. Embrace this rhythm, even for just a few days. The images you get in that low midnight light are worth every disrupted hour of sleep.
Photography Tips
Mirrorless and DSLR: A wide zoom (16-35mm) handles the big landscape compositions. A 24-70mm is versatile for waterfalls, lupine fields, and coastal scenes. Bring a solid tripod and a remote shutter release for long exposure waterfall shots with an ND filter (6 or 10 stop). Weather changes fast; keep your rain cover accessible, not buried in your bag. Spare batteries are critical; even in July, cold early-morning temperatures drain them.
iPhone: Use the ultrawide lens for big waterfall scenes and beach compositions. For Midnight Sun shots, switch to Night Mode and give the camera a few seconds to expose properly; the results can surprise you. At black sand beaches, try Portrait Mode on the sea stacks for an image that separates the subject from a moody sky.
What to Watch Out For
Skógafoss and Jökulsárlón glacier lagoon are genuinely crowded in July. Shoot these at 11 pm or 4 am; the crowds thin dramatically and the light is better anyway. Wind and rain can arrive without warning, even on blue-sky days. Dress in layers and keep your rain cover where you can reach it in under ten seconds.
Planning Notes
Rent a car. There is no other way to experience Iceland on your own schedule, which is essential for photography. Book accommodation along the Ring Road well in advance; the south coast fills fast in July. A circular trip of 7 to 10 days covers the main zones at a photographer's pace. Spend one night in Reykjavik at the start and one at the end. No more than that.
Luxury: The Retreat at Blue Lagoon, ION Adventure Hotel Mid-range: Fosshotel Glacier Lagoon, Hotel Rangá
📷 Pro Photographer Tip
At Stokksnes and Vestrahorn, check the tide tables before you go. The mirror-still reflections on the black sand that make this location famous only happen at low tide, when shallow water pools form on the beach. Arrive at high tide and you get crashing waves instead, which is interesting but entirely different. The reflection shots require low tide and calm wind. Plan your visit around both.
Iceland has three full guides on Chasing Hippoz. Start with my Iceland Southern Route Photography Guide for the south coast locations, waterfalls, and Midnight Sun timing.
4. Provence, France
Why July Specifically
Lavender in Provence blooms from late June through mid-July, and the window is shorter than most people realize. By late July, many fields are already harvested, and what was purple is stubble. Come in the first two weeks of July, and you catch the peak: endless rows of lavender stretching to the horizon, the air thick with fragrance, the Luberon light soft and warm. This is one of the most iconic seasonal landscape photography opportunities in Europe, and it exists for roughly three weeks a year.
Outside lavender season, Provence is still extraordinary in July. Medieval hilltop villages, Roman ruins, sunflower fields, and the golden stone of the Luberon villages glowing in late afternoon light round out a destination that rewards every type of photographer.
What to Photograph
Here is the best advice I can give you about photographing lavender in Provence: skip the famous fields. Everyone knows the Abbey of Sénanque with lavender in the foreground. It is beautiful and also packed with tourists and tripods by 7am. Instead, get in your car and drive down the small farmers' roads through the Valensole Plateau and the Luberon hills. We found incredible, seemingly endless fields far from any crowd, with no one else in sight. The compositions were better, the light was cleaner, and we had time to explore rather than jostle for position.
Beyond lavender, the hilltop villages of Gordes, Les Baux-de-Provence, and Roussillon offer extraordinary light at golden hour. The ochre cliffs of Roussillon at sunset are one of the most underrated photography locations in France.
Best Time to Shoot
Early morning, before 8 am, gives you the best light on the lavender and the coolest temperatures for walking the fields. The rows cast long shadows in the low morning light that add depth and geometry to your compositions. Sunset over the Luberon villages is equally strong. Midday in July is harsh and hot; use it for lunch, a coffee in a village square, and scouting your afternoon locations.
Photography Tips
Mirrorless and DSLR: A wide zoom (24-35mm) captures the rows leading to the horizon. A 70-200mm lens compresses the rows dramatically and isolates a single bee or flower against the purple background. A circular polarizer deepens the blue sky and saturates the lavender. Shoot in RAW; purple tones are notoriously difficult to reproduce accurately in JPEG, and you will want the editing latitude. A small travel tripod is useful for low-angle ground-level compositions.
iPhone: Get low. Seriously low, almost on the ground, and use the ultrawide lens to capture the rows leading away from you toward the horizon. The perspective from ground level transforms a lavender field photograph. Use AE/AF Lock on the midground to balance foreground and sky. Shoot in ProRAW if your iPhone supports it; lavender purple is one of the most challenging colors for smartphone sensors to render accurately.
What to Watch Out For
The bloom window is narrow and varies by year. Check bloom status before you book flights. Several websites and local tourist offices track the lavender bloom in real time each season. A late spring can push peak bloom to mid-July; an early spring can mean fields are already harvested by the first week. Confirm the timing within a few weeks of your travel dates.
Planning Notes
Base yourself in the Luberon, ideally near Gordes or Apt, for central access to both the Valensole Plateau and the village landscapes. July is high season in Provence; book accommodation well in advance. A car is essential. Most of the best lavender fields are accessible only by small rural roads. Temperatures reach 35°C in July; carry water, shoot early, and rest in the shade during the middle of the day.
Luxury: La Bastide de Gordes, Le Domaine de Capelongue (Bonnieux) Mid-range: La Coquillade Village (Gargas), Les Bories & Spa (near Gordes)
📷 Pro Photographer Tip
The best lavender field photograph almost always needs a foreground element beyond just rows. Look for an old stone wall, a lone cypress tree, a rusted gate, or a wooden beehive box at the edge of a field. These details anchor the composition and give the image a sense of place that rows of lavender alone cannot provide. Drive slowly. Stop often. The best fields are rarely the first ones you find.
My Provence Travel and Photography Guide covers the best lavender locations by region, village photography, bloom timing, and where to stay in the Luberon.

5. The Lofoten Islands, Norway
Why July Specifically
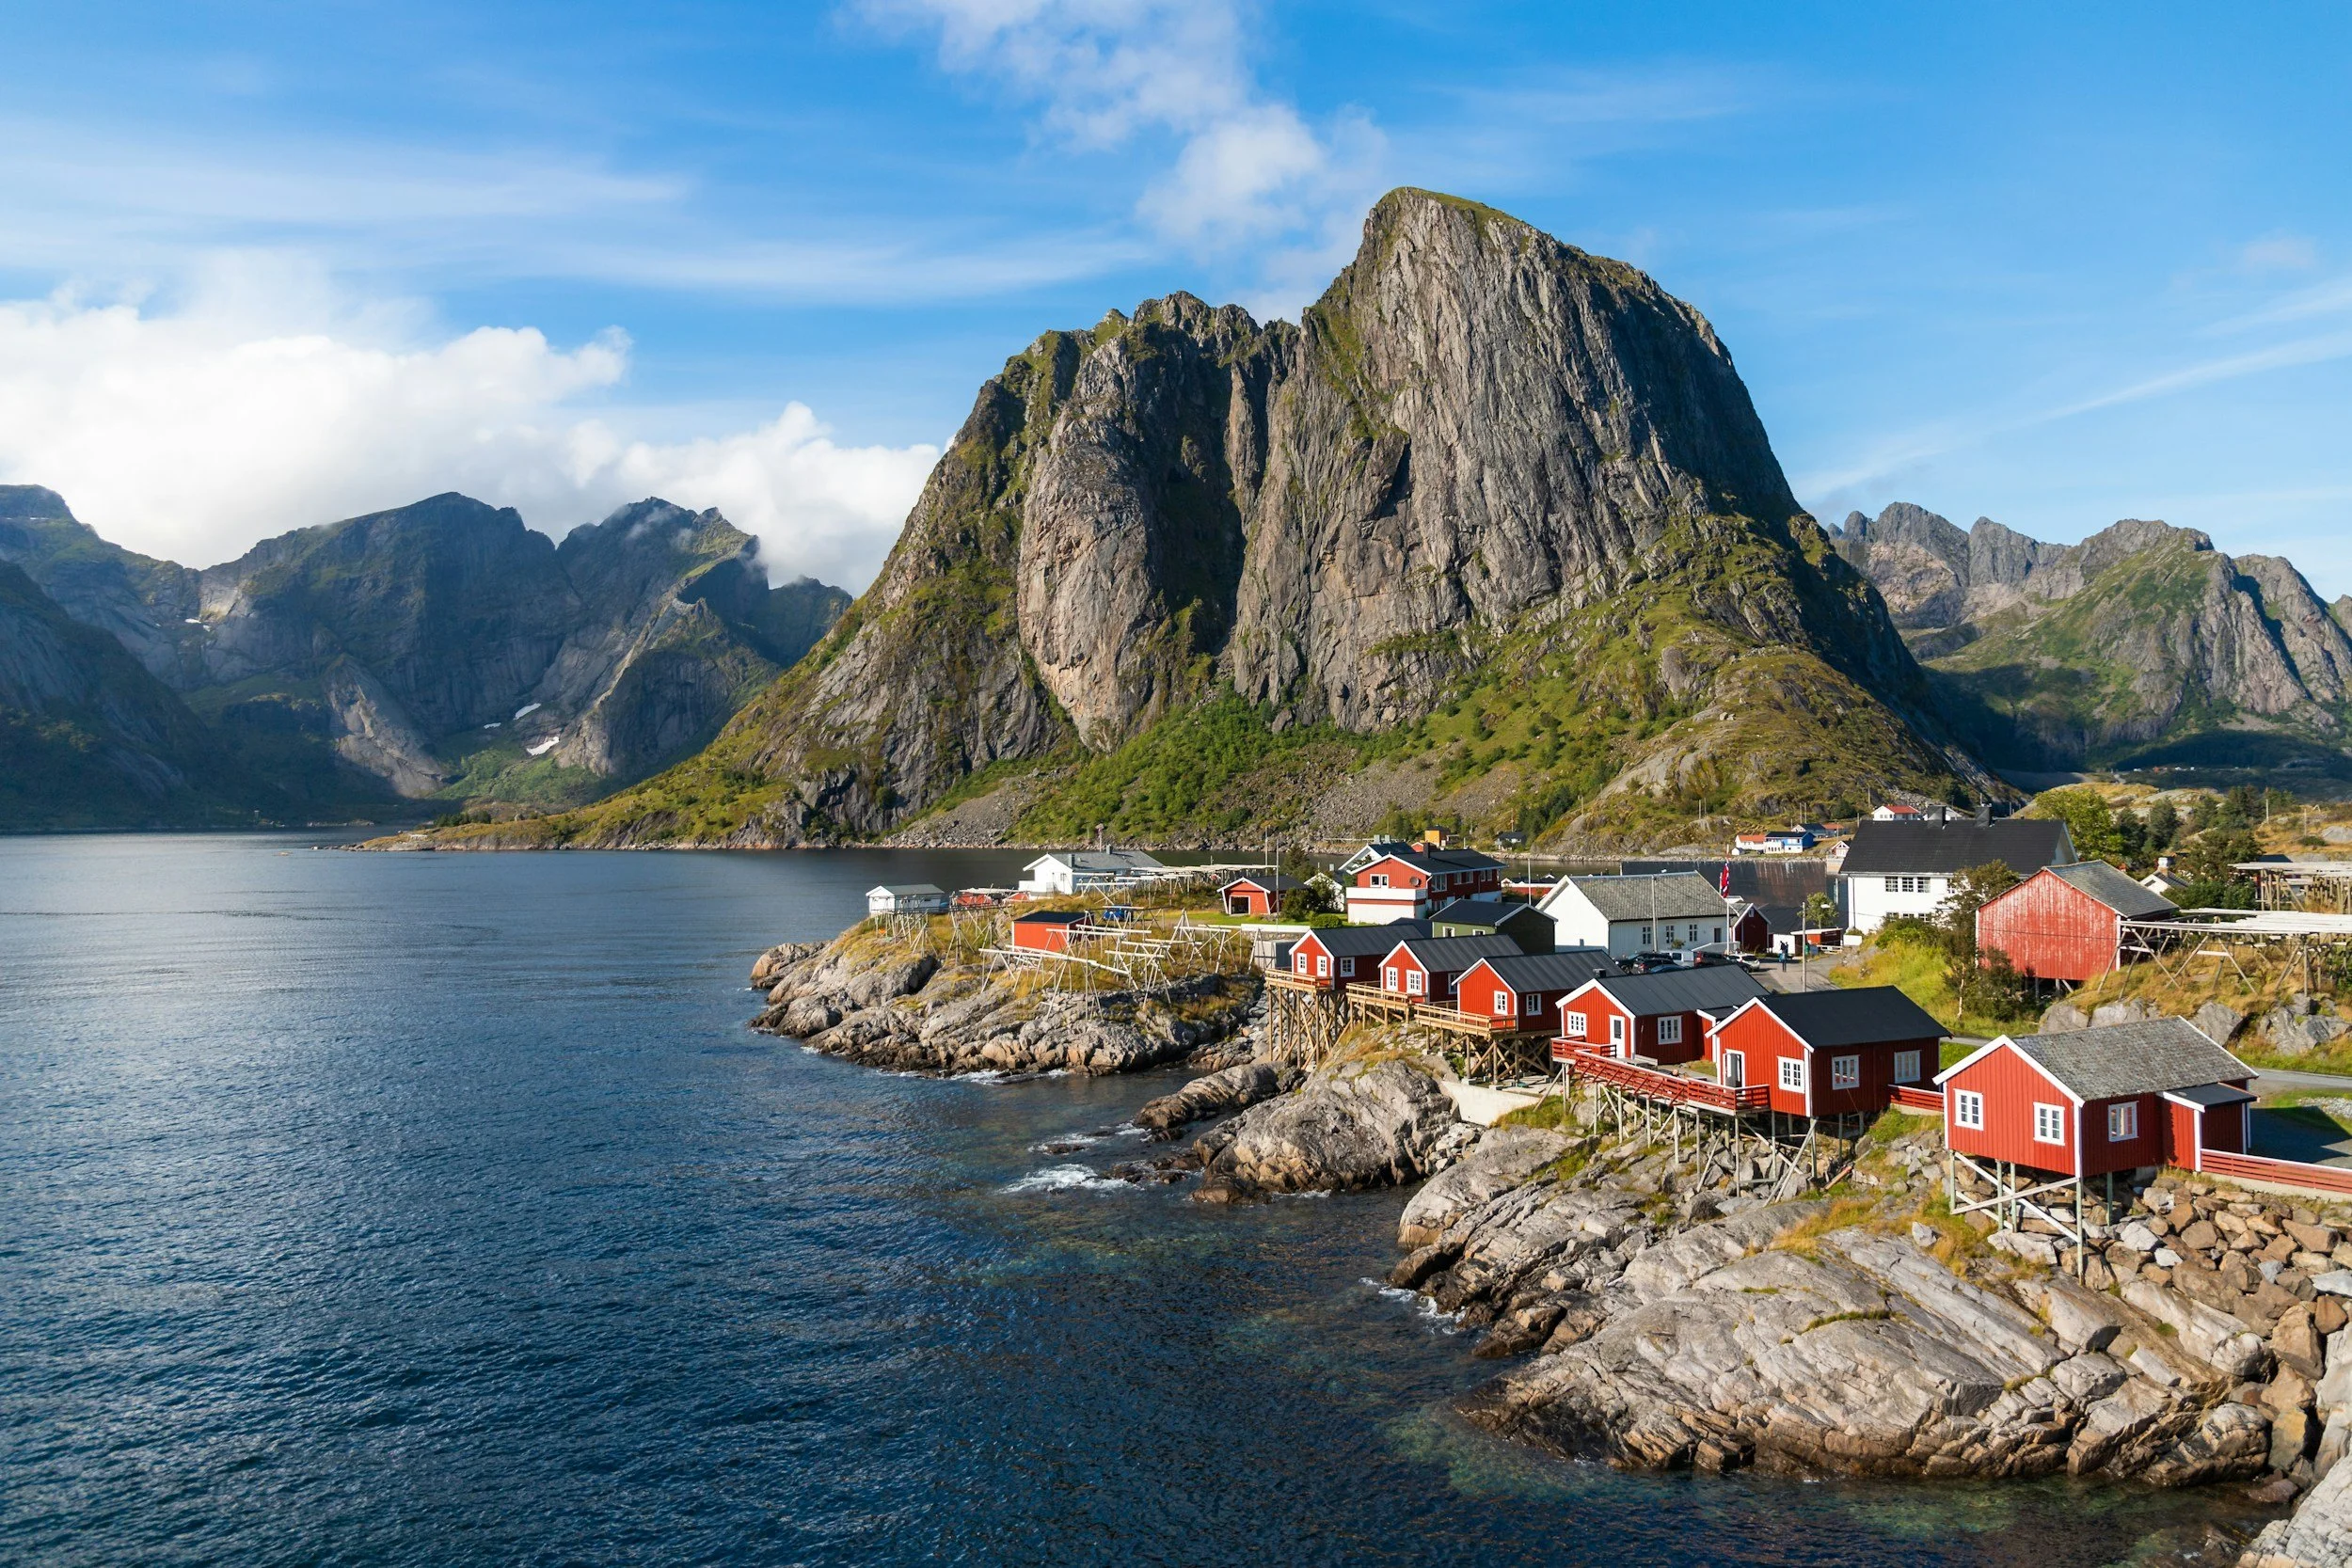
The Lofoten Islands in July offer something that almost nowhere else on earth can match: the Midnight Sun combined with some of the most dramatic mountain and fjord scenery in the world. The sun never fully sets. It dips low on the horizon around midnight, turning the water gold and the mountains amber, and then it rises again. You can photograph Reine or Henningsvær at 11 pm in the same quality of light you would chase at sunrise anywhere else. July also brings calmer seas than the winter months, making more of the islands accessible and the fjord reflections more frequent.
What to Photograph
There are no words that adequately describe the Lofoten Islands. You have to see it for yourself. The jagged mountains rising directly from the sea, the deep blue fjords, and the iconic red fishing huts clustered around small harbor villages. Reine is the most photographed village in Norway, and the view from Reinebringen looking down over the harbor and the peaks is one of the great landscape photography compositions in the world.
But Lofoten rewards exploration beyond Reine. Henningsvær, built across a series of small islands connected by bridges, reflects perfectly in still water at low tide. The village of Å at the southern tip of the archipelago is quieter and equally beautiful. Nusfjord is one of the best-preserved fishing villages in Norway, its red huts unchanged for generations. Drive slowly. Stop at every turnout. Lofoten is a place you will dream of returning to long after you leave.
Best Time to Shoot
Midnight to 2 am is the Midnight Sun window when the light is lowest, warmest, and most directional. Set your alarm and go. This is not optional if you are here for photography. Early morning from 4 am to 7 am and late evening from 9 pm to midnight are both exceptional. The classic daytime hours also produce beautiful light in July, but the Midnight Sun shots are what separate a Lofoten photography trip from every other mountain destination in Europe.
Photography Tips
Mirrorless and DSLR: A wide zoom (16-35mm) handles the big fjord and mountain compositions. A 70-200mm is useful for isolating the red huts against mountain backdrops and compressing the layers of peaks. A tripod is essential for Midnight Sun reflections on the water. Bring a polarizer for the fjords and a 6-stop ND filter for long exposure water shots during the day. Weather changes constantly in Lofoten; a waterproof camera bag and weather-sealed body are not optional extras here.
iPhone: For reflections on the fjords, use Night Mode even when the sun is up but low; it handles the dynamic range of bright sky and dark water better than standard mode. For the red huts at Nusfjord or Reine, use the 3x telephoto lens to compress the scene and make the huts appear larger against the mountain backdrop. The ultrawide captures the full scale of the fjord landscapes, but can make the mountains appear smaller than they are; use the standard lens when you want the peaks to feel imposing.
What to Watch Out For
Reinebringen is the most popular hike in Lofoten. Begin by 5 am at the latest in July to avoid the crowds at the viewpoint. Weather changes without warning; a clear blue morning can turn to fog and rain within an hour. This is not a reason to stay in. Lofoten in moody weather produces some of its most atmospheric images. Embrace the conditions and adapt your compositions. Check ferry schedules between islands in advance; some run limited timetables.
Planning Notes
Fly into Harstad/Narvik or Bodø and drive the E10 highway, which connects the main islands by road and bridge. Base yourself centrally in Svolvær or near Reine for the best access to multiple locations. Accommodation books out fast in July; reserve at least three months ahead. A rental car is essential. Allow at least five days; Lofoten is larger than it looks on a map and rewards a slower pace.
Luxury: Svinøya Rorbuer (Svolvær), Eliassen Rorbuer (Hamnøy) Mid-range: Sakrisøy Rorbuer, Anker Brygge (Svolvær)
📷 Pro Photographer Tip
The reflection shots at Henningsvær and Reine depend entirely on the wind. Check the wind forecast the night before and set your alarm for the calmest window. Even a light breeze destroys the mirror effect on the water. The best reflections happen in the early morning hours after a calm night. The app Windy gives you hour-by-hour forecasts accurate enough to plan your shoot around.
My Lofoten Islands Travel and Photography Guide covers every village, the best hikes for photographers, Midnight Sun timing, and the gear that handles Lofoten's unpredictable weather.
What to Pack for July Photography
These five destinations share some gear requirements but differ enough that your kit needs deliberate choices.
The telephoto is non-negotiable for Kenya. A 100-400mm or longer is your primary lens at the Masai Mara. Nothing else gets you close enough to wildlife at safe and respectful distances. For every other destination this month, a wide to standard zoom covers the majority of your shots.
Bring a sturdy tripod. The Midnight Sun in Iceland and Lofoten means shooting at hours when your body wants to wobble. Long exposure waterfall shots in Iceland and reflection shots in Lofoten both require a stable platform. A carbon fiber travel tripod is light enough to carry on hikes and rigid enough for serious work.
ND filters earn their weight in July. Waterfalls in Iceland at peak flow, reflections on the fjords in Lofoten, and midday compositions in Provence all benefit from a 6-stop or 10-stop ND. Bring both if you have them.
Weather protection matters for three of the five destinations. Iceland, Lofoten, and the Dolomites all deliver sudden rain. A rain cover for your camera bag and a waterproof sleeve for your body are essential. Dolomites afternoon thunderstorms and Lofoten's coastal weather will test unprotected gear.
Carry more batteries than you think you need. Cold mornings in Kenya and Iceland drain batteries faster than moderate temperatures. Continuous shooting during a river crossing or a Midnight Sun session will exhaust a single battery before you expect it. Two camera bodies or four batteries minimum for Kenya.
Continue Planning Your Next Photography Adventure
If July has you inspired, these guides will help you plan the rest of your photography year.
Tanzania: The Serengeti in July offers the same Great Migration energy as Kenya, with a different landscape character. Open plains, ancient kopjes, and Mara River scenes that rival anything in Africa.
Iceland Westfjords and Snaefellsnes: If you want Iceland without the south coast crowds, this guide covers the remote northwest, where the landscapes are just as powerful, and the photographers are far fewer.
Zermatt, Switzerland: July is one of the best months to photograph the Matterhorn. Wildflowers in the foreground, snow on the peak, and long golden hour windows make it a natural companion to a Dolomites trip.
Tuscany, Val d'Orcia: Sunflower fields peak in early July. The rolling hills, cypress trees, and medieval towns photograph beautifully in the warm summer light.
The Galápagos Islands: July through November is the clearest season in the Galápagos, with calm seas and extraordinary wildlife photography on land and underwater.
Frequently Asked Questions
Where is the best place to travel and photograph in July? Kenya's Masai Mara is the strongest single photography destination in July because of the Great Migration river crossings, which begin this month. If wildlife photography is your priority, there is nowhere better on earth right now. For landscape photography, the Lofoten Islands during the Midnight Sun and Iceland's south coast are equally compelling choices.
When does the lavender bloom in Provence? Lavender in Provence typically peaks between late June and mid-July, though the exact timing varies by year and elevation. Lower-elevation fields near Valensole bloom slightly earlier than higher Luberon fields. Check local bloom trackers in the weeks before your visit to confirm current conditions before you book flights.
What is the Midnight Sun and when does it happen? The Midnight Sun occurs above the Arctic Circle when the sun stays above the horizon for 24 hours or more. In Norway's Lofoten Islands and across Iceland, late June through mid-July offers the most intense conditions. For photographers, this means golden hour quality light from roughly 10pm to 2am without the sun ever fully setting.
How do I photograph wildlife on safari without a professional camera? A current iPhone Pro model with a 3x telephoto lens produces excellent safari images at close range. For river crossings and distant animals, accept the focal length limitation and focus on wide environmental compositions that tell the story of the landscape and the event. The most important factor on safari is your guide and your vehicle position, not your gear.
Is July a good time to visit Iceland? July is Iceland's warmest and most accessible month. Roads are fully open, waterfalls run at peak flow, and the Midnight Sun gives photographers extraordinary light at unusual hours. The trade-off is that July is also peak tourist season; the most popular locations are crowded. Shoot early in the morning or late at night, get off the main tourist circuit, and you will have the experiences you came for.
What should I photograph in the Dolomites in July? The enrosadira alpenglow at sunrise and sunset is the priority. Wildflower meadows at Alpe di Siusi, Tre Cime di Lavaredo in early morning light, and Val Gardena villages at golden hour are all exceptional in July. Budget at least five days and base yourself in two different areas to cover the full range of compositions the region offers.
How far in advance should I book a Masai Mara safari for July? Book at least six months in advance, ideally nine to twelve months, for the best camps during peak Migration season. The premier camps along the Mara River fill well ahead of the July and August window. Last-minute availability exists but rarely at the properties that matter most for photography.
Can I photograph the lavender fields in Provence independently? Absolutely. Rent a car, use Google Maps to explore the Valensole Plateau and the Luberon backroads, and drive slowly with your windows down. The best fields are often the ones you find by turning down an unpaved track that looks promising. A local photography guide can help if your time is very limited, but the independent approach often produces more interesting and personal results.
What is the best lens for the Lofoten Islands? A wide zoom (16-35mm) handles the big fjord and mountain compositions. A 70-200mm lens compresses the scenes beautifully and isolates the red fishing huts against mountain backdrops. If you can only bring one lens, the 24-70mm is the most versatile, but you will wish you had both ends at different points in the trip.
Is July too crowded to photograph in Europe? July is peak season across Europe, but crowding is manageable with the right approach. Shoot at first light. The difference between arriving at Tre Cime di Lavaredo at 5:30 am and 9 am is hundreds of people. The same principle applies everywhere this month. The photographers who complain about crowds are almost always the ones who show up after breakfast.
All photography guides on Chasing Hippoz are written from personal experience in the field. Follow @chasinghippoz on Instagram for photos from these destinations and subscribe to the newsletter for new guides, photography tips, and seasonal destination advice delivered directly to your inbox.
Finally—a beginner-friendly photography guide that makes sense.
If you've ever picked up a camera and thought, "Now what?" this is the book for you.
Photography Made Simple is written for adults who are just starting out and want a clear, encouraging, real-world approach to learning photography. Whether you're using a DSLR, mirrorless, or just your smartphone, this guide walks you through the basics—without the jargon or tech overwhelm.
Inside, you'll learn:
The only camera settings you really need to know to get started
How to shoot sharper, more intentional photos using light and composition
Simple tips for portraits, landscapes, travel, and everyday life
What gear you do (and don’t) need
How to create better photos without upgrading your camera
You’ll also get practical exercises, cheat sheets, and tips for organizing and editing your images—plus the confidence to shoot off Auto Mode for good.
This is not a textbook. It’s a friendly guide to seeing the world with fresh eyes—and finally capturing what you see the way you imagine it.
📸 Format: PDF download
Pages: 100+
Perfect for: Beginners, hobbyists, and anyone ready to take better photos without the stress