THE BEST LIGHTROOM EXPORT SETTINGS FOR DELIVERING PHOTOS TO CLIENTS
EXPORT SETTINGS IN LIGHTROOM FOR HIGH QUALITY IMAGES
A few days ago, I photographed a graduation session for a client here in Washington, DC. After spending time selecting the best images, editing each in Lightroom, and ensuring every photo looked its best, I sent the final gallery to my client this morning.
It reminded me that while photographers spend a lot of time learning to capture and edit beautiful images, many aren't quite sure which Lightroom export settings to use when it's time to deliver those photos.
Choosing the wrong export settings can result in unnecessary compression, inaccurate colors, or files that aren't ideal for printing. Fortunately, Lightroom makes it easy once you know which options to choose.
Whether you're delivering graduation photos, portraits, weddings, corporate headshots, travel photography, or fine art prints, these are the Lightroom export settings I use to deliver professional, high-quality images to my clients.
Let's walk through the process step by step.
Best Lightroom Export Settings for Clients
SettingRecommendationFile FormatJPEGQuality100Color SpacesRGBResize to FitOffResolution300 PPIOutput SharpeningScreen, StandardWatermarkOffMetadataCopyright & Contact Information
1. EXPORT LOCATION AND FILE NAMING
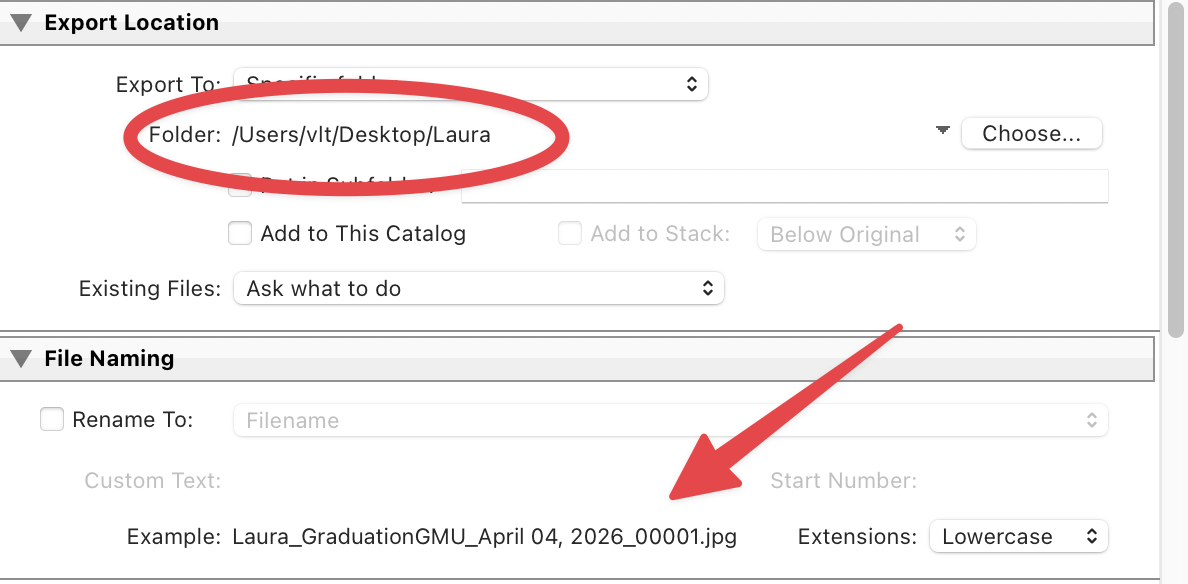
The first step is choosing where your files will be saved and giving them professional file names.
Export your images to the appropriate folder on your computer or external drive, then use a consistent naming system that makes it easy for both you and your client to identify each image.
Instead of generic names like:
IMG_1234.jpg
Use a naming format such as:
ClientName_YYYYMMDD_ProjectName_001.jpg
For example:
Laura_20260708_Graduation_001.jpg
Using a consistent naming system keeps your files organized, makes it easy for clients to locate specific images, and looks much more professional. You can also include your business name at the end of each filename if you prefer.
2. IMAGE FORMAT
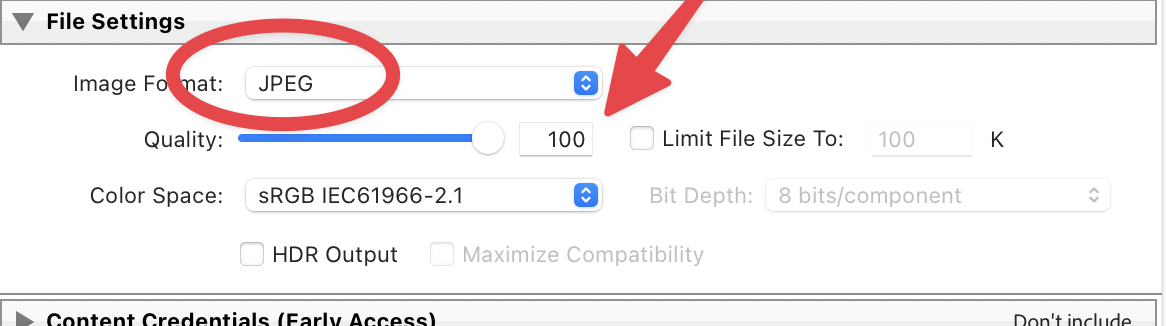
For almost every client delivery, JPEG is the best option.
JPEG files provide excellent image quality while maintaining manageable file sizes. They are compatible with virtually every computer, phone, tablet, photo lab, and printing service.
Recommendation: Export as JPEG unless your client specifically requests another format.
3. QUALITY SETTINGS
The Quality slider controls the amount of JPEG compression applied during export.
For client delivery, I recommend setting the Quality slider to 100. This provides the least amount of compression and preserves every detail from your edited image.
While Quality settings between 90 and 95 often look nearly identical, I prefer exporting final client images at Quality 100. Storage is inexpensive, and it ensures your clients receive the highest quality files possible.
Recommendation: Quality 100.
4. COLOR SPACE
Color space determines how colors are displayed on different devices.
For nearly all client deliveries, sRGB is the best choice because it offers the greatest compatibility with:
Professional print labs
Consumer printing services
Computers
Smartphones
Websites
Social media
Using sRGB helps ensure your clients see colors that closely match your edited images.
Recommendation: Color Space, sRGB.
5. RESOLUTION
Lightroom allows you to specify the resolution in Pixels Per Inch, or PPI.
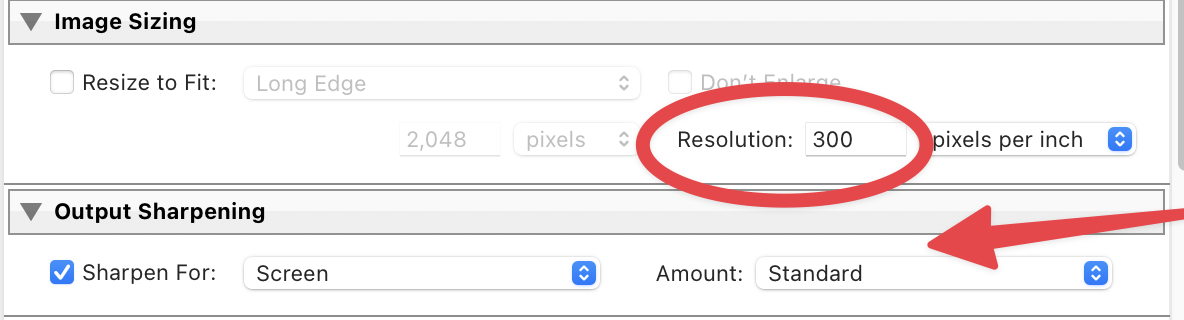
For client delivery, use 300 PPI, which is the standard setting for professional printing.
It's worth noting that the PPI setting does not change the actual quality of your digital image. Image quality is determined by the number of pixels in the file. Setting the resolution to 300 PPI simply provides the appropriate print information for professional labs.
Recommendation: 300 PPI.
6. IMAGE SIZING
If your client wants the highest quality images possible, do not resize them.
Leave Resize to Fit unchecked so Lightroom exports the photos at their full native resolution.
Only resize your images if your client specifically requests smaller files or if you're creating images for websites or social media.
Recommendation:
Resize to Fit: Off
Export at Full Resolution
7. OUTPUT SHARPENING
Lightroom offers output sharpening based on how the images will be viewed.
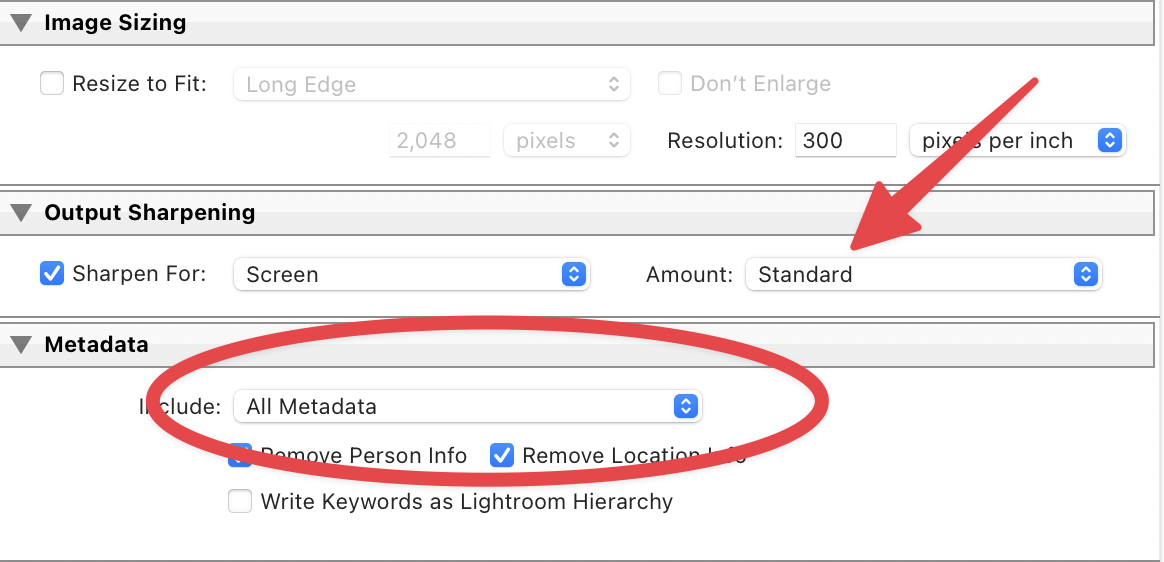
For most client deliveries, Screen, Standard delivers excellent results because clients typically view their images on computers, tablets, and phones before printing.
If you're exporting for printing, choose the appropriate option: Matte Paper or Glossy Paper.
Recommendation:
Sharpen For: Screen
Amount: Standard
8. METADATA
Metadata includes information stored within your image file, including camera settings, copyright information, and contact details.
I recommend including your copyright and contact information with your exported files. This helps identify your work while keeping the files professional.
Recommendation: Include Copyright and Contact Information.
9. WATERMARKS
Unless your client has requested proof images, avoid adding watermarks to your final deliverables.
Clients expect clean, professional images that are ready for printing and personal use.
Recommendation: Watermark Off.
10. HOW TO DELIVER YOUR PHOTOS TO CLIENTS
Now that you've exported your images using the best Lightroom settings, it's time to deliver them to your client.
Because full-resolution JPEGs are often several gigabytes in size, sending them as email attachments isn't practical. Instead, I recommend using WeTransfer, one of the easiest and most reliable ways to send large files.
Simply upload your exported images, enter your client's email address, and send them a secure download link. Your client doesn't need to create an account, making the process quick and hassle-free.
There are other excellent file-sharing services, including Dropbox, Google Drive, and Adobe Creative Cloud. However, I continue to recommend WeTransfer because it is simple, fast, and incredibly easy for clients to use.
Pro Tip
Before sending your files, open several of the exported images to make sure everything looks exactly as expected. Taking one final look only takes a minute and helps ensure your client receives the highest quality images possible.
WHY THESE LIGHTROOM EXPORT SETTINGS MATTER
Delivering high-quality images reflects your professionalism and ensures your clients receive exactly what they expect.
Following these export settings helps you:
Preserve every detail from your edits.
Maintain accurate colors across different devices.
Provide files that are ready for professional printing.
Deliver images that are easy for clients to view, share, and archive.
Create a consistent workflow for every photography session.
SAVE THESE SETTINGS AS AN EXPORT PRESET
Once you've entered these settings, save them as an Export Preset in Lightroom.
Click Add in the Export Presets panel, give your preset a name such as Client Delivery, and save it. The next time you export images, you'll be able to apply all of your preferred settings with a single click.
This simple step saves time, reduces mistakes, and helps you deliver professional results consistently for every client.
Frequently Asked Questions
What is the best Lightroom export quality?
100
Should I export in JPEG or TIFF?
JPEG for almost every client.
Should I export in sRGB or Adobe RGB?
sRGB.
Should I resize photos before sending them?
No.
Should I sharpen exported images?
Yes.
Use Screen, Standard.
Does 300 PPI improve image quality?
No.
It only affects printing.
Common Lightroom Export Mistakes
❌ Exporting at 72 PPI, thinking quality changes
❌ Exporting Adobe RGB
❌ Accidentally resizing images
❌ Watermarking final client files
❌ Forgetting output sharpening